This the multi-page printable view of this section. Click here to print.
Miscellaneous Blog Posts
Recovering Lost Files with Windows File Recovery
Deleting your files is sometimes just too easy to do, here what you can do in order to save what you may have lost.
Recycle Bin
Before using Windows File Recovery, first make sure that your files aren’t still on your computer in the recycle bin.
To access the recycle bin, press the start button and search for Recycle Bin. A file explorer menu should then be shown that will show you what items remain in your recycle bin. If the files you are looking for are there, right click on them and choose restore in order to restore your file. If the files are not there, you will have to try an alternative method.
Windows File Recovery
If the files are not available in your recycle bin, the first thing you should do is turn off your computer. The more you use the drive the files were deleted from, the less of a chance you have of being able to recover your files. This is due to what deleting files actually does, which is explained more at the end of this post. If possible, it is recommended to complete the rest of this tutorial on a different computer.
Requirements
Before you can get started with Windows File Recovery, there are a couple things you need:
- A computer with Windows 10 2004 or above installed (Ideally not the computer that the deleted files are on)
- A way of connecting the drive that the file(s) were deleted from to the second computer
- A working internet connection
Install Windows File Recovery
The first thing you will need to do is install the Windows File Recovery software, which is available on the Microsoft Store
Recover Your Lost Files
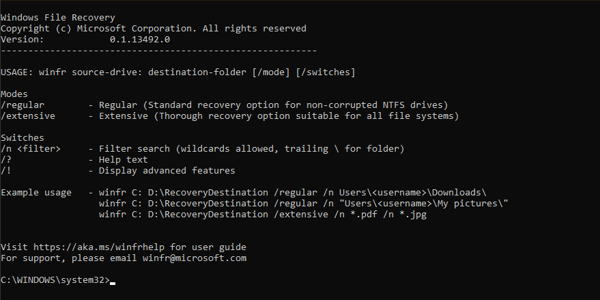
Now that you have Windows File Recovery installed, run it, and it should open a command line that looks something like this:

Windows File Recovery
Here you can run the winfr commands, which are all used to recover deleted files. The base usage of the command is:
winfr source-drive: destination-folder [/mode] [/switches]
Source Drive
The source drive is the drive that the deleted files were deleted from. If you are connecting the drive to a different computer, it will likely be D:, however you should check which drive it is connected as through your file explorer under This PC
Destination Folder
The destination-folder is the folder you want to put the recovered files into. This cannot be on the same drive you are recovering files from
Mode
The mode is the recovery mode you want to be using. There are three options for the mode you want to:
normal(orntfs) is used for healthy drives that use NTFS. Assuming that you have only deleted the files, and nothing has happened to the drive itself, this is what you should use.segmentis used for slightly damaged drives that use NTFS.signatureis used for slightly damages drives of any kind, and will likely take a long time to complete.
Filters
Filters can be used to specify what files you want to recover. This is useful when you know the name of the file that you deleted and just want to recover that one file. You set a file by adding /n <filter> to your recovery command.
For example, if you deleted a family picture, you can run a command like this:
winfr D: C:\RecoveryDestination /ntfs /n FamilyPicture2020.jpg
Or if you deleted a word document but can’t seem to remember what the name was:
winfr D: C:\RecoveryDestination /ntfs /n *.docx
Or if you somehow deleted all of your documents:
winfr D: C:\RecoveryDestination /ntfs /n Users\<username>\Documents\
You can alternatively use the /y filter to define a set of extensions to recover. This filter can only be used on signature mode.
For example, if you deleted that family picture but you can’t remember what the name was or if it was a jpg or a png:
winfr D: C:\RecoveryDestination /signature /y:jpg,png
You can also specify multiple /n filters, so you can do this in a different way:
winfr D: C:\RecoveryDestination /ntfs /n *.jpg /n *.png